Appearance
How to Self-Publish a Free Book That Is Truly Freely Given
— Andrew Case
Many feel intimidated when it comes to making their book available free of cost or hindrance, and have lots of practical questions about where to start. This guide is for you.
A common misconception is that you need a legacy publisher to typeset, format, and publish your book in order for it to be successful, beautiful, and professional. That is simply not true. God, in his providence, has given us incredible tools that allow us to circumvent the unbiblical system of most legacy Christian publishers and reach far more people with our work. So this is a comprehensive guide meant to demystify the steps involved in self-publishing a book in a way that truly accords with Christ’s command to freely give (Matt 10:8).
From choosing typesetting software and formatting your manuscript, to navigating the publishing platforms, this guide covers most of the essential details to get you started. It explains how to leverage free tools and services, as well as freelance assistance when needed. While there is definitely a learning curve to this process, it is not out of reach for anyone who has a desire to grow and try new things. You’ll be surprised by how much trouble, time, and money you’ll save by not going with a legacy Christian publisher, while enjoying full control over the presentation, distribution, and updating of your work. Follow these steps, and you'll be able to self-publish a high-quality book that’s genuinely free for readers around the world.
Why Can’t I Just Go with a Traditional Publisher?
Most traditional Christian publishers do not operate according to the dorean principle in Matthew 10:8. Instead, they take away authors' rights and put their work behind a paywall and other restrictions that keep millions of people (especially in developing countries) from accessing the grace, truth, and biblical wisdom God has freely given to his Body (for more info on this, see our video on the subject, and read The Christian Commons).
Here are some key benefits of self-publishing compared to traditional publishing, as well as some downsides of going with a legacy publisher:
Benefits of Self-Publishing:
Control - As an independent author, you retain full creative control over your work, from content to book cover design and pricing.
Faster Route to Market - The publishing process is entirely in your hands, allowing you to get your book out much quicker than the lengthy timelines of traditional publishers.
Global Distribution - Self-publishing platforms like Amazon KDP enable you to reach readers worldwide easily.
No Exclusivity - You (not the publisher) own the work and can spread it and update it without restrictions.
Drawbacks of Traditional Publishing:
Loss of Creative Control - Publishers often demand revisions and have control over elements like cover art and book titles. And they have many blindspots, failures, and lack of objectivity when it comes to these things.
No Ownership - You will have to transfer the rights to your work temporarily or permanently to the publisher. You will not be allowed to give it away in digital form.
Slow Process - Books can take 1-2 years to be released after being acquired by a publisher.
Cost - Your book will be much more expensive than a self-published book.
Competitiveness - It's extremely difficult to get accepted by a major publisher no matter how famous or gifted you are.
Lack of Care - No one will ever care about your book as much as you do, especially a large publisher. They only care about your book insofar as it makes them money. Therefore, the attention to detail, elements of the design, etc., will not matter to them as much as they will to you if you have full control over the publishing process.
Disobedience to God & Scripture - Traditional Christian publishers are actively engaged in the sin of simony (Acts 8:18-19), of selling truth (Micah 3:11), peddling God’s Word (2 Cor 2:17), showing partiality to the rich (James 2), failing to reflect the generous heart of God, and violating the command of Christ (Matt 10:8). By publishing with such publishers, authors become complicit (often unintentionally) with these sins.
See also this podcast about Joe the Author.
How to Typeset Your Book
We highly recommend modeling your book’s layout and design after the design of a beautiful book you admire. Observe the size of the text, margins, spacing between lines, how titles are arranged, how footnotes are presented, etc. This will take a lot of the guesswork out of what you want to produce. With some attention to detail you’ll be able to learn a lot about what makes an attractive book inside and out. And if you want an excellent guide for some of the most common pitfalls to watch out for in typesetting a book, you can check out this free PDF. For those who learn well from YouTube tutorials, here are some high-quality ones to get your started on the topics of typography and layout & composition.
That said, your first step will be to choose what typesetting software you’ll use. We will discuss free and open-source options here.
The most user-friendly option may be LibreOffice Writer, especially for typical non-academic books. Technically, Writer is not a typesetting program. But if you learn to use styles and format correctly, it can be a powerful tool and sufficient for many use cases. For those who already own Microsoft Word and are more familiar with it, Word can also provide the same powerful tools that approximate a typesetting program if you learn how to use styles and advanced formatting.
For even more professional control, and for writing technical and academic books, consider using LaTeX or Scribus. These are both typesetting tools, but they have different approaches and use cases. Here are the main differences between them:
Markup vs. WYSIWYG (What You See Is What You Get):
LaTeX uses a markup language, where you write plain text mixed with formatting commands. It doesn't provide a visual interface for typesetting; instead, you write code and compile it to generate the final output.
Scribus is a WYSIWYG application, meaning you can visually manipulate and arrange the elements on the page as you would in a desktop publishing program like Microsoft Publisher or Adobe InDesign.
Learning Curve:
LaTeX has a steeper learning curve, as you need to learn its syntax and commands. However, once you understand the basics, it can be efficient for creating consistent and high-quality typesetting, especially for technical documents with complex mathematical equations or cross-references.
Scribus is generally more user-friendly for beginners, as the WYSIWYG interface is more intuitive and similar to other desktop publishing software.
Output Quality:
LaTeX is renowned for producing high-quality, professional-looking typesetting, ideal for academic and scientific documents. It handles complex mathematical equations, cross-references, and bibliographies exceptionally well.
Scribus also produces high-quality output, but it may require more manual adjustment and tweaking to achieve the same level of typographic refinement as LaTeX for complex documents.
Automation and Consistency:
LaTeX is highly automated and consistent. Once you define the styles and formatting rules, they are applied consistently throughout the document, making it easier to maintain a uniform appearance.
In Scribus, consistency relies more on manual adjustments, though you can create and apply styles and templates to maintain a consistent look.
Document Types:
LaTeX is primarily used for creating technical and academic documents, such as research papers, theses, books, and articles with complex structures and extensive cross-referencing.
Scribus is more versatile and can be used for a broader range of document types, including books, magazines, brochures, newsletters, and other print and digital publications.
In summary, LaTeX is a powerful and specialized tool for creating consistently formatted and typographically excellent technical documents. Scribus is a more general-purpose desktop publishing application suitable for a wider range of document types, offering a more user-friendly WYSIWYG interface. The choice between the two often depends on the complexity of your project, your typesetting requirements, and your familiarity with markup languages or desktop publishing software. And if you need help, you’ll find plenty of tutorials for them on YouTube. We recommend Scribus for most people, and they offer a free, excellent, thorough set of tutorial videos.
As you learn and have questions along the way, make sure to harness AI chats to ask questions about the software you're using so that you get the answers you need quickly and efficiently. ChatGPT, Microsoft Copilot, Google Gemini, and Claude are all excellent options.
Consider Hiring a Freelance Typesetter
If you prefer not to handle the typesetting process yourself, you can hire a freelance typesetter on platforms like Fiverr or Upwork. These platforms allow you to browse portfolios, read reviews, and hire professionals with experience in book typesetting and formatting. Provide them with your manuscript and specifications, and they can deliver a professionally typeset book ready for publishing for a very reasonable price (like $20). This is a positive option because it gives you the opportunity to support the work of talented people in low-income countries.
Fonts
Fonts play a crucial role in the typesetting process, as they can greatly impact the readability and overall aesthetic appeal of a book. Choosing the right font can enhance the reading experience, while an inappropriate or poorly designed font can be a distraction and detract from the content itself.
When it comes to book interiors, the font choice should prioritize legibility and clarity, especially for body text. Popular choices include serif fonts like Garamond, Baskerville, Caslon, Palatino, Crimson, and Crimson Pro, which have a traditional, book-like appearance and are known for their readability. Sans-serif fonts, such as Myriad Pro, Helvetica, and Calibri, can also work well for headings, captions, and other secondary text elements.
There are many high-quality, professional fonts available for free online. Websites like Google Fonts and Open Font Library offer a wide range of open-source fonts that can be used for both personal and commercial purposes without any licensing fees. These platforms provide a convenient way to browse, preview, and download fonts that meet your typesetting needs, ensuring your book has a polished and professional appearance while avoiding additional costs.
Keep in mind that some webfonts are not suitable for serious typesetting because of:
Limited Feature Sets: Webfonts are often designed for efficiency and readability on screens, so they may lack the extensive character sets and stylistic features found in professional fonts. These features can include things like ligatures (special combinations of characters), swashes (ornate flourishes), and a wider range of weights and italics.
Hinting Issues: Webfonts rely on browser rendering to display correctly on different screens. This can sometimes lead to hinting issues, where the font appears blurry or uneven at small sizes. Professional fonts are often hinted specifically for high-resolution print output.
Control: In typesetting, designers have a lot of control over how text appears, including kerning (spacing between letters) and tracking (overall letter spacing). Webfonts may not offer the same level of control.
Focus on Readability: Webfonts are optimized for quick comprehension on various devices. For serious typesetting, a focus might be on aesthetics and creating a specific mood or style, which some webfonts might not be designed for.
If you plan to use biblical language fonts and/or special academic symbols that relate to biblical studies or manuscripts, we recommend the free fonts from SBL, and LogosSymbolUnicode.
Choose a Publishing Platform
If you plan to publish your book in physical form, you'll need to choose a print-on-demand platform first. These platforms have certain page sizes available for your book, and particular requirements for the formatting, so it's best to know that upfront before beginning the typesetting process. We recommend Amazon KDP. If you prefer not to use Amazon’s services, here’s a comparison of four of the most popular options:
IngramSpark
Wide distribution to online retailers (Amazon, B&N, etc.) and bookstores
Higher printing costs
Offers hardcover, paperback, ebooks and enhanced distribution options
Barnes & Noble Press
Easy ordering for B&N retail and online stores
Limited reach beyond Barnes & Noble's own ecosystem
Draft2Digital
Wide distribution to many online retailers including Amazon, Apple Books, B&N, and others
User-friendly interface and they allow you to offer your ebook for free across most platforms
Ideal for publishing your book to a large number of platforms while only having to manage one account
Much higher printing costs
Amazon KDP (Kindle Direct Publishing)
Offers paperbacks and hardcovers
Easy to use, seamless integration with Amazon's retail platform
Lower printing costs
Less distribution options than IngramSpark
Because of the lower printing costs, our experience with the platform, and our ability to guarantee that it will allow you to make your book truly free without accruing royalties, we recommend Amazon KDP.
Set up your document and format your content
Adjust the page size, margins, and other formatting settings according to your chosen publishing platform's requirements. Structure your book with appropriate headings, subheadings, and styles. Use consistent formatting throughout, such as font type, size, and line spacing. Insert page breaks, section breaks, and other formatting elements as needed.
Add front matter and back matter, and make your license and intentions clear
Create a title page, copyright page, table of contents, preface, acknowledgments, and any other front matter sections. At the end of your book, include an index, glossary, or other back matter sections if applicable.
It's important to make it clear in the front matter that your book is dedicated to the public domain, that the paper copies are being sold by a secular third party (like Amazon) at cost, that you are not profiting from the sale of the print edition, and that you're willing to send a free print copy to those who have no device on which to read the ebook and can't afford a print edition.
Use this guide to free the bookHere's an example:
Andrew Case, Praying the Bible Together, 2023
Dedicated to the public domain. All of this publication may be shared, translated, sold, or copied freely without limitation and without permission. To learn more about why this book is freely given (Matt 10:8), please visit sellingJesus.org.

It's important to state the book is public domain and to display the link to the legal code (included in the badge in this case). The rest of the text can be customized. Also, add something like the following to the description of your book on your website and even in the back matter of your book:
Cost should never be “an obstacle in the way of the gospel of Christ” (1 Cor 9:12), so if you'd like a physical copy of this book, but can't afford one, please contact us at _________ and it will be our pleasure to fill your request.
Insert images and create a cover
If your book contains images or graphics, ensure they are high resolution and properly sized. Learn about the different image formats, and become familiar with how to manipulate and create them, as well as what PPI is and how it affects your images.
| Type | Made of | Size | Quality | Use case |
|---|---|---|---|---|
| SVG | Shapes | Small | No loss | Only for logos and illustrations made on a computer |
| JPG | Pixels | Medium | Some loss | Photos and other detailed images |
| PNG | Pixels | Large | No loss | When quality loss with JPG would be noticeable |
SVGs are the best format as they are small and infinitely scalable, but only for illustrations made on a computer. You should generally never convert to SVG from another format; you need to create illustrations with it from the start.
You should also not generally convert a JPG to PNG as it will not improve the quality and will just increase the size. If, however, your PNG images are too large, you should try converting them to JPGs.
Design a cover for your book using free graphic design options like Canva (which also has a free pro option for non-profits), Photopea, GIMP, or Inkscape. We recommend AI art generators like Midjourney, Leonardo AI, or Bing/Chat GPT Plus (just make sure you upscale everything to high resolution), and ask AI chats (like the ones mentioned above) for creative design ideas. Alternatively, you can hire a freelance designer on platforms like Fiverr or Upwork.
Publish the Physical Book
If you choose to publish on Amazon KDP, we recommend the following settings for the setup:
Public domain work
“All territories (worldwide rights)”
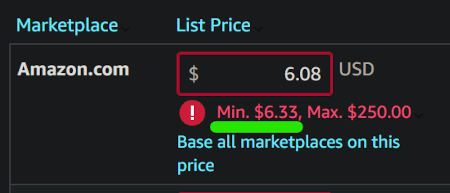
Set the price in each country to the minimum required by Amazon. This will ensure that you receive no royalties from sales.
- Leave “Expanded distribution” unchecked
For all the other details, here's a step-by-step tutorial on how to use Amazon KDP.
Turning Your Book into an Ebook
After publishing the print version of your book, it’s time to convert it to an ebook. There are many ways to do this for free. Kindle Create and Sigil are a couple of options, and Calibre helps you convert ebooks to multiple formats. It’s also possible to create one manually with a word processor like Word, and there are many YouTube tutorials on how to do that. You could also hire a freelancer to do it for you inexpensively. Some ebook aggregators like Draft2Digital now accept .docx files directly, so you don’t have to do a lot of special formatting. Draft2Digital will also give you the option of entering information for different sections of your book (like the back matter or table of contents) and then they will automatically format and insert it in the appropriate sections of your ebook.
If you typeset your book in Scribus, it offers the ability to export your book into ebook formats like EPUB and Kindle's format (LaTeX doesn’t offer this unfortunately). Scribus will take the layout and formatting of your book and convert it into the ebook format, creating a single file that can be directly uploaded to ebook platforms or loaded onto ebook readers. While Scribus handles the ebook export decently, some find that dedicated ebook formatting tools like Calibre or others mentioned above provide better control and optimization for ebook output. But for basic ebook conversions, Scribus's built-in export can be a convenient option.
Making Your Ebook Free on Amazon & Other Platforms
Amazon is the biggest and most convenient place for most people to find and access your book. But Amazon hates the idea of making things completely free, so they put obstacles in your way if you want to do that. The cheapest you can make an ebook on Amazon by default is 99 cents. Here's what you'll need to do to get the price down to zero:
Sign up for a Draft2Digital account: Go to their website and create an account if you don't already have one..
Add a new book: Start the process of creating a new ebook through your account. This will reveal all the things you’ll need, such as the cover file and resolution recommended. And don’t miss their style suggestions. All of this will help you know better how to prepare your files for their platform. On Fiverr.com and other places you’ll find affordable freelancers who will be happy to format your book to work well with Draft2Digital if you’d rather have help.
Watch this tutorial video to help guide you through the process.
Upload your ebook separately to Amazon KDP and publish it there. Make sure it's linked to your print version if you chose to publish a print version through them.
Wait for your book to be approved and added to major outlets like B&N, Kobo, and Apple Books. This may take a couple weeks.
Report the lower price to Amazon: From your KDP dashboard, go to the bottom of the page, click “Contact Us,” and write them a message, letting them know that you’d like to price-match your book as free. Specify which book, along with its Amazon link and identification number, and paste in the precise URLs for your book’s listing on B&N, Apple Books, and Kobo.
Note: If you try reporting the lower price before your title is available on sites like B&N and Apple Books, it won’t work.
- Wait for Amazon's Price Match: The next part is up to Amazon. Sometimes they'll price match and set your book to zero, and sometimes they won't. It's uncertain how long it will take, or whether they'll reduce the price to zero. So far it has worked every time for me.
Other File Formats
To ensure maximum usability and ease of producing derivatives and translations, aim to provide your books in a variety of open and accessible file formats. The ideal approach is to make available not only the final rendered formats, like PDF and EPUB, but also the source files used to create those formats.
For example, providing the original manuscript files in formats like .docx, .odt, a Google doc, or whatever original file format you used to typeset it in (LaTeX, Scribus, etc.), allows others to easily modify the content as needed, run it through Google Translate, change the formatting, styling, page layout, etc.
An entire book can be translated using Google Translate, though will still need reviewing by a native speaker. If you click on the “Documents” tab, you’ll have the option to upload your entire book file, as long as it’s in a .docx or .pdf format. If you have all of your book text in a Google Doc, you can click Tools > Translate document, and that will translate it as well.
Open formats like .html, .epub, and .xml are also valuable, as they can be easily converted to other ebook formats or used to generate accessible versions like those compatible with screen readers or braille displays. By providing a comprehensive set of source and output files in both proprietary and open formats, you can maximize the potential for your work to be utilized, adapted, and built upon by others, fostering a more open and collaborative ecosystem for sharing truth.
To make these files universally available, you can leverage a variety of platforms and services. One option is to create a dedicated website or online repository where all the files can be freely downloaded. If you don’t want to create a website, you can use online libraries and archives specifically designed for hosting open books and educational resources, such as Unglue.it, Internet Archive, or Open Library. These sites allow authors to upload their works and make them permanently available for free.
Serving and Bearing Burdens
If you’re feeling overwhelmed by what’s involved in making your book freely available, that’s normal. Pace yourself, take one step at a time, read a productivity book like What’s Best Next or Deep Work, and commit your labor to God in prayer. Be encouraged that God is honored by any extra effort you exert to freely give. As with all followers of Christ, authors are called to serve those they minister to out of love (Gal 5:13). Your work to create beautiful, useful, edifying books that adorn the gospel is an act of bearing the burdens of others (Gal 6:2), and reflects the heart of our Master who came not to be served, but to serve (Mark 10:45).
What If I Need Help?
If you get stuck and need some personal help, there are two people you can reach out to who would be happy to help you answer questions you can’t get answers to from YouTube tutorials, AI, or forums:
- Johnathan: JohnathansLiterature@gmail.com
- Courtney: courtney.sj@lyndnex.com